
Full Integration Guide
This is the full end to end integration guide for integrating the white-label API flow.
Build Your Own UI with Meld APIs
This comprehensive guide walks you through building a custom cryptocurrency interface using Meld's White-Label API Integration. Perfect for developers who want complete control over the user experience while leveraging Meld's crypto infrastructure.
Important: This is White-Label API Integration, NOT Meld Checkout Integration (Public Key URL). This approach requires custom UI development and API integration.
CRITICAL: API Changes & CompatibilityNon-Breaking Changes (No Versioning):
- New fields may be added to API responses at any time
- Your system MUST handle unexpected fields gracefully
- Avoid strict JSON validation that rejects unknown properties
Breaking Changes (Versioned):
- Field modifications or deletions will be versioned
- Released approximately with advance notice
Required Actions:
- ✅ Use flexible JSON parsing (ignore unknown fields)
- ✅ Implement defensive coding practices
- ✅ Test with mock responses containing extra fields
IMPORTANT: Automatic Onramp Provider ManagementAutomatic Additions:
- Meld may automatically enable onramps for your account based on:
- Conversion rates and user success
- Competitive pricing
- Geographic coverage for your users
Automatic Removals:
- Onramps may be disabled due to:
- Compliance or regulatory issues
- Technical problems or outages
- Provider service interruptions
Manual Control:
- Contact Meld to opt out of automatic management
- Request specific provider additions/removals
- Set custom provider preferences for your account
Technical Architecture
┌─────────────┐    ┌─────────────┐    ┌─────────────┐    ┌─────────────┐
│   Your UI   │◄──►│  Meld APIs  │◄──►│ Provider UI │───►│   Your UI   │
│             │    │             │    │  (Widget)   │    │             │
├─────────────┤    ├─────────────┤    ├─────────────┤    ├─────────────┤
│ • Quotes    │    │ • Pricing   │    │ • Payment   │    │ • Status    │
│ • Selection │    │ • Sessions  │    │ • KYC       │    │ • Results   │
│ • Launch    │    │ • Webhooks  │    │ • Compliance│    │ • Tracking  │
└─────────────┘    └─────────────┘    └─────────────┘    └─────────────┘
Prerequisites
Before starting, ensure you have:
- ✅ API key from the Meld dashboard
- ✅ Webhook endpoint (recommended)
- ✅ Basic understanding of REST APIs
- ✅ Development environment set up
Step 1: Get User Location
Get the user's country to set default values and compliance requirements.
Best Practice: Ideally, automatically detect the user's country from their device/browser using geolocation or IP detection rather than prompting them to manually select.
Auto-Detection (Recommended):
// Sample Code: Auto-detect user's country
function detectUserCountry() {
  // Option 1: Browser geolocation API
  if (navigator.geolocation) {
    navigator.geolocation.getCurrentPosition((position) => {
      const country = getCountryFromCoordinates(position.coords);
      return country;
    });
  }

  // Option 2: IP-based detection
  const country = await fetch('/api/detect-country').then(r => r.json());
  return country;
}
Manual Override Option:
If users choose to override the auto-detected country, they can get a list of supported countries and flags from this API:
// Sample Code: Get supported countries list with flags
GET /service-providers/properties/countries?accountFilter=true
For US Users - State Requirements:
// Sample Code: Also collect state information for US users
// Some US states have heavy restrictions on crypto and may not be supported
const location = "US-NY"; // Format: Country-State
Screenshot: Meld Widget showing automatic country detection with manual override option
API Response Example:
{
  "countries": [
    {
      "countryCode": "US",
      "countryName": "United States",
      "states": ["US-NY", "US-CA", "US-TX", ...]
    },
    {
      "countryCode": "GB",
      "countryName": "United Kingdom"
    }
  ]
}
Step 2: Get Currency and Payment Defaults
Based on the user's country, get default settings to streamline the experience.
Get Country Defaults:
// Sample Code: Get default currency and payment method for country
GET /service-providers/properties/defaults/by-country?countries={countryCode}
Response:
[
  {
    "countryCode": "BR",
    "defaultCurrencyCode": "BRL",
    "defaultPaymentMethods": [
      "PIX",
      "CREDIT_DEBIT_CARD",
      "BINANCE_CASH_BALANCE"
    ]
  }
]
Note: Response is an array. Default payment methods returns an ordered list with the most recommended option first.
Get Available Fiat Currencies:
Users can choose to use a different fiat currency than the default, so call this endpoint to populate a currency selection menu:
// Sample Code: Get all available fiat currencies for the country
GET /service-providers/properties/fiat-currencies?countries={countryCode}&accountFilter=true
Get Payment Methods:
// Sample Code: Get payment methods available for selected fiat currency
GET /service-providers/properties/payment-methods?fiatCurrencies={fiatCurrency}&accountFilter=true
UI Implementation:
// Sample Code: Set defaults but allow user override
const defaults = countryDefaults[0]; // Get first country from response array
const userSettings = {
country: detectedCountry,
fiatCurrency: defaults.defaultCurrencyCode || 'USD',
paymentMethod: defaults.defaultPaymentMethods[0] // Use first (most recommended) option
};
// Provide dropdowns for user to change defaults
renderCurrencySelector(availableFiatCurrencies);
renderPaymentMethodSelector(availablePaymentMethods);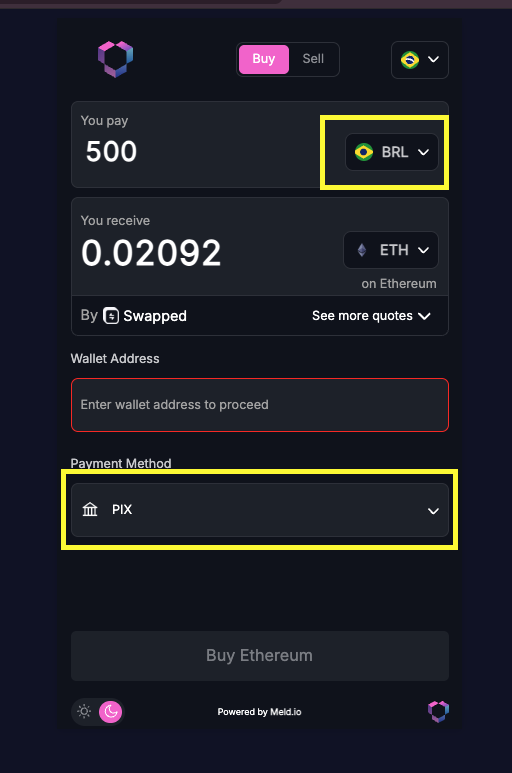 Screenshot: Meld Widget showing default fiat currency and payment method selection
Step 3: Get Cryptocurrencies
Display available cryptocurrencies based on user's location and preferences.
API Call:
// Sample Code: Get available cryptocurrencies for the country
GET /service-providers/properties/crypto-currencies?countries={countryCode}&accountFilter=true
Response Example:
{
  "cryptoCurrencies": [
    {
      "currencyCode": "BTC",
      "currencyName": "Bitcoin",
      "networkCode": "BTC",
      "networkName": "Bitcoin"
    },
    {
      "currencyCode": "ETH_ETHEREUM",
      "currencyName": "Ethereum",
      "networkCode": "ETHEREUM",
      "networkName": "Ethereum"
    }
  ]
}
UI Implementation:
// Sample Code: Create searchable crypto selector
function renderCryptoSelector(cryptoCurrencies) {
  return cryptoCurrencies.map(crypto => ({
    value: crypto.currencyCode,
    label: `${crypto.currencyName} (${crypto.networkName})`,
    icon: getCryptoIcon(crypto.currencyCode)
  }));
}
Screenshot: Meld Widget showing cryptocurrency selection interface
Step 4: Get Amount and Purchase Limits
Validate user input against provider limits and display helpful guidance.
Get Purchase Limits:
// Sample Code: Get purchase limits for validation
GET /service-providers/limits/fiat-currency-purchases?accountFilter=true
Response Example:
{
  "limits": {
    "USD": {
      "minAmount": 20,
      "maxAmount": 20000,
      "dailyLimit": 5000,
      "monthlyLimit": 20000
    }
  }
}
User Input Validation:
// Sample Code: Validate user input against limits
function validateAmount(amount, currency, limits) {
const limit = limits[currency];
if (amount < limit.minAmount) {
return {
valid: false,
message: `Minimum purchase: $${limit.minAmount}`
};
}
if (amount > limit.maxAmount) {
return {
valid: false,
message: `Maximum purchase: $${limit.maxAmount}`
};
}
return { valid: true };
}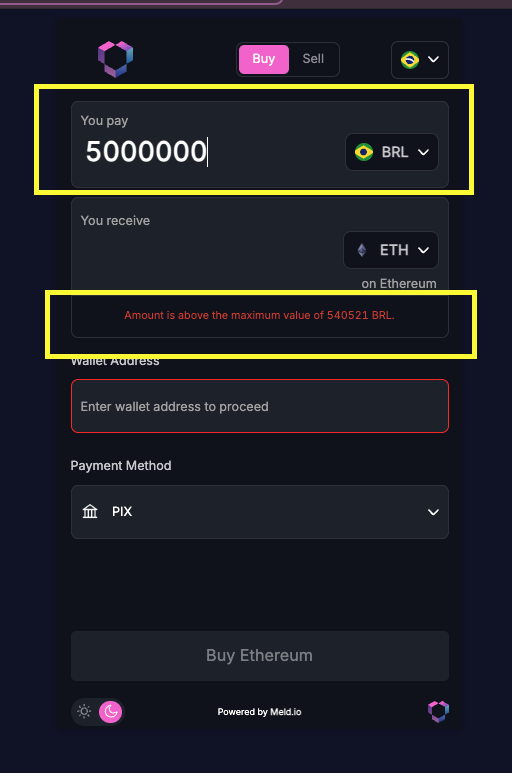 Screenshot: Meld Widget showing amount input with purchase limits validation
Caching Note:
Performance Tip: The data in steps 1-4 rarely changes. Cache responses for 1 week to reduce latency.
Step 5: Get a Real-Time Quote
Fetch live pricing from multiple providers and display options to the user.
It is important that you tie each user to a Meld customerId or externalCustomerId (they map 1:1). This will ensure that the rampIntelligence suggests the best quote for the user.
API Call:
// Sample Code: Get real-time quotes from multiple providers
POST /payments/crypto/quote
Request Body:
{
  "externalCustomerId": "user_123",
  "sourceAmount": "200",
  "sourceCurrencyCode": "USD",
  "destinationCurrencyCode": "ETH",
  "countryCode": "US",
  "walletAddress": "0xfCFAa8059080D01b27ccA2B1fA086df0853397E6"
}
Response Example:
{
  "quotes": [
    {
      "transactionType": "CRYPTO_PURCHASE",
      "sourceAmount": 200.00,
      "sourceAmountWithoutFees": 195.83,
      "fiatAmountWithoutFees": 195.83,
      "destinationAmountWithoutFees": null,
      "sourceCurrencyCode": "USD",
      "countryCode": "US",
      "totalFee": 4.17,
      "networkFee": 0.17,
      "transactionFee": 2,
      "partnerFee": 2,
      "destinationAmount": 0.04308219,
      "destinationCurrencyCode": "ETH",
      "exchangeRate": 4642.290,
      "paymentMethodType": "CREDIT_DEBIT_CARD",
      "serviceProvider": "UNLIMIT",
      "rampIntelligence": {
        "rampScore": 20.00,
        "lowKyc": false
      }
    },
    {
      "transactionType": "CRYPTO_PURCHASE",
      "sourceAmount": 200,
      "sourceAmountWithoutFees": 196.93,
      "fiatAmountWithoutFees": 196.93,
      "destinationAmountWithoutFees": null,
      "sourceCurrencyCode": "USD",
      "countryCode": "US",
      "totalFee": 3.07,
      "networkFee": 0.11,
      "transactionFee": 1,
      "partnerFee": 1.96,
      "destinationAmount": 0.042577,
      "destinationCurrencyCode": "ETH",
      "exchangeRate": 4697.4,
      "paymentMethodType": "CREDIT_DEBIT_CARD",
      "serviceProvider": "ROBINHOOD",
      "rampIntelligence": {
        "rampScore": 19.76,
        "lowKyc": false
      }
    }
  ],
  "message": null,
  "error": null,
  "timestamp": null
}
Key Response Fields Explained:
rampScore: Meld's recommendation score (higher = better conversion likelihood)lowKyc: Whether provider requires minimal identity verification
 Screenshot: Meld Widget showing multiple provider quotes with ranking
🏆 MELD RECOMMENDED QUOTE RANKING
Use Meld'srampScore for optimal conversion rates!
Meld provides a rampScore in each quote that represents the likelihood of transaction success based on:
- Historical conversion rates for similar transactions
- Provider reliability and success rates
- User location and payment method compatibility
- Real-time provider performance data
Recommended Quote Sorting:
// Sample Code: Use Meld's recommended ranking for best results
function rankQuotesByMeldScore(quotes) {
  return quotes.sort((a, b) => {
    // Primary: Sort by rampScore (higher = better)
    if (a.rampScore !== b.rampScore) {
      return b.rampScore - a.rampScore;
    }

    // Secondary: Sort by destinationAmount (more crypto = better)
    return b.destinationAmount - a.destinationAmount;
  });
}
Best Practice: Always display the highestrampScorequote first to maximize transaction success rates and user satisfaction.📊 Learn More: See Ramp Intelligence for advanced ranking strategies.
Step 6: Launch Provider Payment UI
When user selects a quote, create the provider session and get a provider URL to launch their payment UI in a webview, new tab, or redirect.
API Call:
// Sample Code: Create widget session to get provider URL
POST /crypto/session/widget
Request Body:
{
  "sessionData": {
    "walletAddress": "bc1qxy2kgdygjrsqtzq2n0yrf2493p83kkfjhx0wlh",
    "countryCode": "US",
    "sourceCurrencyCode": "USD",
    "sourceAmount": "100",
    "destinationCurrencyCode": "BTC",
    "serviceProvider": "TRANSAK",
    "redirectUrl": "https://yourapp.com/transaction-complete"
  },
  "sessionType": "BUY",
  "externalCustomerId": "user_123",
  "externalSessionId": "session_456"
}
Response Example:
{
  "id": "WePLapZetkn1hfeKFScf3T",
  "externalSessionId": "session_456",
  "externalCustomerId": "user_123",
  "customerId": "WXEX4DsAX7cp6Ch78oq2w3",
  "widgetUrl": "https://meldcrypto.com?token=eyJhbGciOiJIUzI1NiIsInR5cCI6IkpXVCJ9...",
  "serviceProviderWidgetUrl": "https://transak.com/?sessionId=asjknakjnjknwejksdnjkdsjkfnsd",
  "token": "eyJhbGciOiJIUzI1NiIsInR5cCI6IkpXVCJ9..."
}
Note that thewidgetUrlreturns a Meld url, which iframes the onramp's url (if allowed) or does a full redirect to the onramp's url for the onramps that block iframing. TheserviceProviderWidgetUrldirectly returns the url of the onramp. You can choose to launch either one, based on your preference. We recommend using theserviceProviderWidgetUrlinstead of thewidgetUrl
Recommendation:
Provider UI Launch Implementation:
Desktop Implementation:
// Sample Code: Launch provider UI in popup window
function launchProviderUI(sessionResponse, options = {}) {
  const popup = window.open(
    sessionResponse.serviceProviderWidgetUrl,
    'meld-widget',
    'width=450,height=700,scrollbars=yes,resizable=yes'
  );

  // Note: Meld will redirect the user back when the transaction is complete
  // The popup will need to be closed based on your application's flow
}
Mobile Implementation:
// Sample Code: Launch provider UI on mobile
function launchMobileProviderUI(sessionResponse) {
  // For webviews
  if (isMobileApp()) {
    window.ReactNativeWebView?.postMessage(
      JSON.stringify({
        type: 'OPEN_WEBVIEW',
        url: sessionResponse.serviceProviderWidgetUrl
      })
    );
  } else {
    // Mobile browser - full redirect
    window.location.href = sessionResponse.widgetUrl;
  }
}
Screenshot: Meld Widget launching onramp service provider UI
Important Notes:
Redirect Domain Whitelisting: Some providers require redirect domain whitelisting. Contact Meld support if provider UIs don't redirect back properly.📱 Mobile Considerations: Webviews are recommended for mobile apps, but external browser works too.
Transaction Completion: Meld does not send completion events or use redirect parameters. When a transaction is complete, Meld simply redirects the user back to your specifiedredirectUrl. You should track transaction status through webhooks, not through redirect handling.
Step 7: Track Transaction
Monitor transaction progress and update your UI as the user completes the flow.
Webhook Setup Required: Sign up for webhooks in the Meld Dashboard. You will receive a webhook each time a transaction is created or updated.
You will receive webhooks from Meld every time a transaction is created or updated. To learn more about the various Meld webhook events as well as see examples, click here.
Webhook Integration:
// Sample Code: Webhook endpoint receives transaction updates
app.post('/webhook/meld', (req, res) => {
  const { transactionId, status, externalCustomerId } = req.body;

  // Use webhook as trigger to fetch full transaction details
  const transactionDetails = await fetchTransactionDetails(transactionId);

  // Update user's transaction in your database
  updateTransaction(transactionId, transactionDetails);

  // Notify user via websockets, push notifications, etc.
  notifyUser(externalCustomerId, {
    transactionId,
    status,
    message: getStatusMessage(status)
  });

  res.status(200).send('OK');
});

// Sample Code: Fetch transaction details when webhook arrives
async function fetchTransactionDetails(transactionId) {
  const response = await fetch(
    `/payments/transactions/${transactionId}`,
    {
      headers: {
        'Authorization': `BASIC ${apiKey}`,
        'Meld-Version': '2025-03-04'
      }
    }
  );
  return await response.json();
}
Transaction Status Display:
// Sample Code: Display user-friendly status messages
function getStatusMessage(status) {
  const statusMessages = {
    'PENDING': 'Processing your transaction...',
    'SETTLING': 'Finalizing crypto transfer...',
    'SETTLED': 'Complete! Crypto sent to your wallet.',
    'FAILED': 'Transaction failed. Please try again.',
    'CANCELLED': 'Transaction was cancelled.'
  };

  return statusMessages[status] || 'Transaction status updated.';
}![]() Screenshot: Meld Widget showing transaction status tracking
Screenshot: Meld Widget showing transaction status tracking
Status Reference: See Transaction Statuses for complete status definitions.
API Response Caching Guide
Optimize performance by caching static data and keeping real-time calls fresh.
Cache Weekly (Static Data):
const CACHE_WEEKLY = 7 * 24 * 60 * 60 * 1000; // 1 week in milliseconds

// Cache these API responses:
- Countries list
- Fiat currencies by country
- Payment methods by currency
- Crypto currencies by country
- Purchase limits by currency
Real-Time Calls (Never Cache):
// Always fetch fresh:
- Crypto quotes
- Widget session creation
- Transaction details
- Transaction status
Implementation Example:
class MeldAPICache {
  constructor() {
    this.cache = new Map();
  }

  async getCountries() {
    const cacheKey = 'countries';
    const cached = this.cache.get(cacheKey);

    if (cached && Date.now() - cached.timestamp < CACHE_WEEKLY) {
      return cached.data;
    }

    const data = await this.fetchCountries();
    this.cache.set(cacheKey, {
      data,
      timestamp: Date.now()
    });

    return data;
  }
}
Best Practices & Tips
Performance Optimization:
- Cache static data for 1 week
- Debounce quote requests when user types amounts
- Preload country/currency data on app startup
- Use CDN for crypto icons and assets
User Experience:
- Show loading states during API calls
- Display fees clearly before transaction
- Provide transaction estimates (settlement time)
- Handle errors gracefully with retry options
Error Handling:
async function handleAPIError(error, endpoint) {
  const errorMap = {
    401: 'Invalid API key or authentication failed',
    403: 'Access forbidden - check account permissions',
    429: 'Rate limit exceeded - please wait and retry',
    500: 'Server error - please try again later'
  };

  const message = errorMap[error.status] || 'Unknown error occurred';

  // Log for debugging
  console.error(`API Error (${endpoint}):`, error);

  // Show user-friendly message
  showErrorToUser(message);
}
Security Considerations:
- Never expose API keys in frontend code
- Validate all user inputs before API calls
- Use HTTPS only for API communications
- Implement rate limiting to prevent abuse
Next Steps
Testing Your Implementation:
- Testing Credentials - Comprehensive testing strategies
Advanced Features:
- Webhook Events - Real-time updates
- Dashboard Data - Track performance
- Ramp Intelligence - Improve success rates
Production Deployment:
- Network Partner Setup - Configure additional onramps
Support & Resources
- Complete API Reference - All endpoints documented
- FAQ - Common questions answered
This guide provides everything needed to build a production-ready crypto interface. Most teams complete their custom UI integration within 1-2 weeks using this approach.
Updated 17 days ago